
|
MOmarsh Hardcore Gear and Hunts - Waterfowl-Works Marshmellow Performance Exhausts
|
|
|
MOmarsh Hardcore Gear and Hunts - Waterfowl-Works Marshmellow Performance Exhausts
|
|
|||||||
 |
|
|
Thread Tools

|
Search this Thread
|
Rate Thread
|
Display Modes
|
 09-12-2009, 01:10 AM
|
#1 |
|
Senior Refuge Member
Join Date: Oct 2006
Location: California
Posts: 226
|
How to build an Electronic Duck Butt Feeder (Pulsator)
This is a great tool to add some motion to your spread. I looked into
buying one but the price (~$150) kept me from doing it. I was able to
build this one for about $75. What follows are the instuctions on how
to make your own electronic duck butt feeder.
Thanks to those on this site for their input. Parts you will need: Avery Greenhead Gear Over-Size Feeding Mallard decoy (duck butt) (2 for $19.99 @ Cabelas) 12V 2 terminal thermal flasher Part# 552 ($3.00 @ Pep Boys) 12V 7AH Sealed Lead Battery (~$20.00 online) Attwood Tsunami 500GPH bilge pump ($17.50 @ Walmart) 2-pole flat wiring connector ($2.00 @ Pep Boys) 4 16-14 gauge weatherproof/waterproof butt connectors (Pep Boys or West Marine) 2 16-14 gauge butt connectors (can be substituted for the weatherproof/waterproof ones above) Mesh drywall tape (Home Depot) 1/2" pvc plug (Home Depot) 1/4" heat shrink tube (4 x 4" pieces) (Home Depot or Lowes) 5' 16AWG brown lamp wire cord (Home Depot) 4 16-14AWG Female connectors (Home Depot) 1 tube 5200 3M Marine Sealant (Home Depot) 1 large Outdoor Products watertight box ($9.00 @ Walmart) 1 x 1/2" 90 deg conduit (Home Depot) 1 Krylon Olive Drab camo spray paint can 2 2" wood screws 1 roll masking tape Tools: Torch or lighter Wire cutters Wire stripper Cordless drill 19/64" drill bit 7/8" drill bit Crimper Sharpie permanent marker 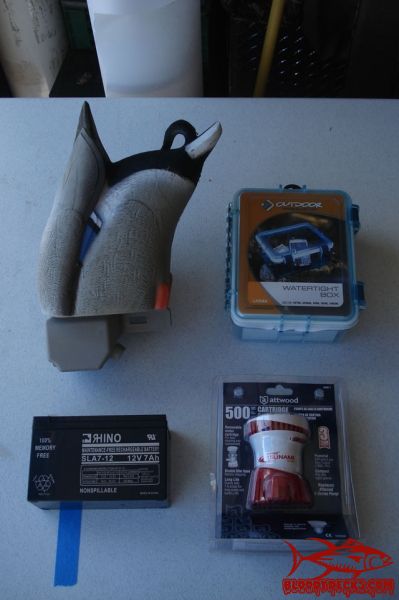 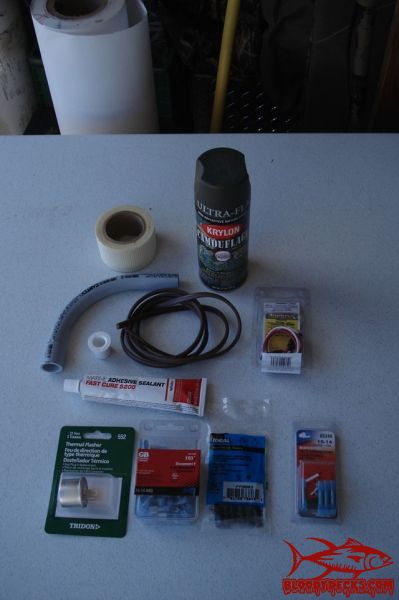
|


|


|
|
09-12-2009, 01:11 AM
|
#2 |
|
Senior Refuge Member
Join Date: Oct 2006
Location: California
Posts: 226
|
Step 1:
The first step is to spray paint the conduit and the bilge pump. Paint one side of the conduit, let dry, then flip over and spray the other side. I prefer to do two coats of paint. Spray the bilge pump next, two coats. 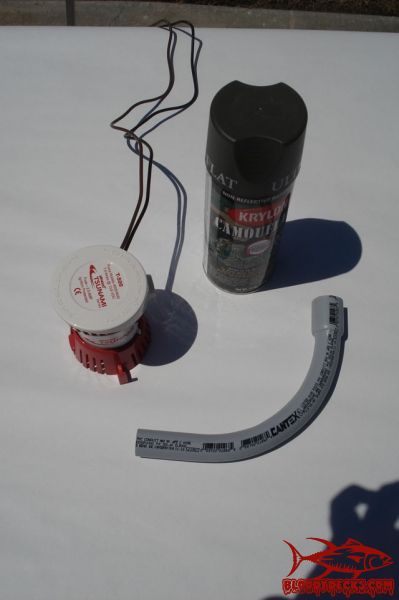 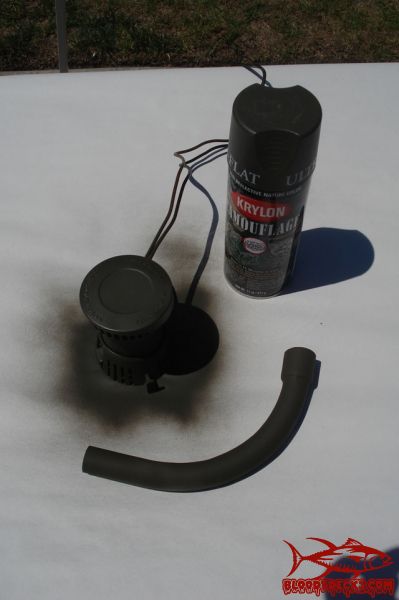 Let these dry and then set them aside, we will assemble them later. |
|
|
|
|
09-12-2009, 01:12 AM
|
#3 |
|
Senior Refuge Member
Join Date: Oct 2006
Location: California
Posts: 226
|
Step 2:
If you are using a sealed lead battery then you can actually get away with not using the watertight box. The only issue with that is you will have to create a watertight container for the thermal flasher. If you want to go this route you can do a google search for the way to do it. I prefer to use the watertight box as it makes it incredibly easy to change the thermal flasher if it goes bad and it makes for a cleaner looking final product. You first need to put the battery into the watertight case. Once you have it in slide the battery to one side. Take the 1/2" pvc plug and position it on the inside (at one end of the box) so it will clear the battery. Hold it in place while you make the center of the plug on the outside of the box with a sharpie. 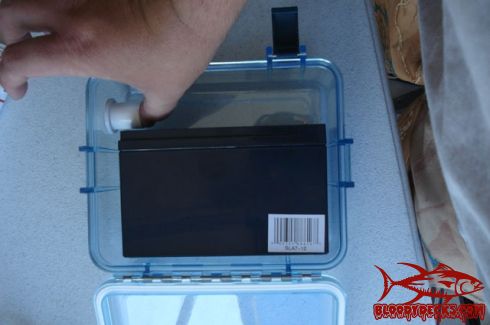 Next take the 7/8" drill bit, center it on the mark you made on the outside of the box and drill through the box. Drill slowly so as not to crack the box. 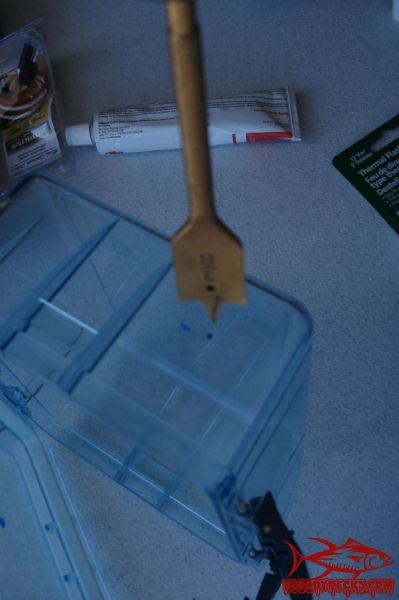 Once this is done insert the 1/2" plug into the hole. You want to make sure the clearance with the battery is good. If you didn't mark it correctly and the battery will not fit then you will need to go buy another watertight box. 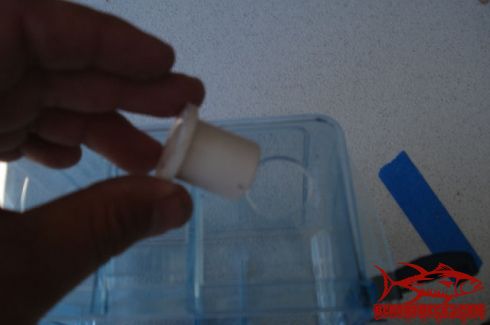 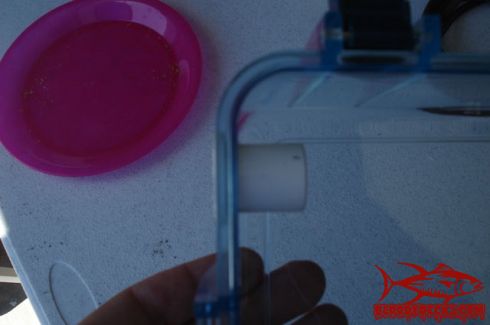  You will now take the 19/64" drill bit and drill a hole in the center of the 1/2" pvc plug. You do not have to drill it perfectly centered but it helps to try. It helps to hold the plug with a pair of pliers or a vice while drilling it. I would not suggest holding it in your hand while doing it. 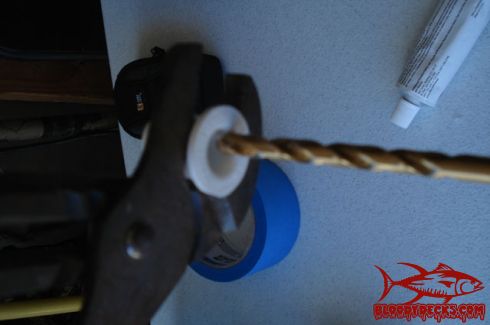
|
|
|
|
|
09-12-2009, 01:13 AM
|
#4 |
|
Senior Refuge Member
Join Date: Oct 2006
Location: California
Posts: 226
|
Step 3:
Take the 2-pole flat connector and cut the wires down to about an inch long. Strip 1/4-3/8" off the end of the wire. Most 2-pole connectors come as a pair that are connected by about 6-7" of wire. You want to cut both the connectors off and save the excess wire. Put both the 2-pole connectors to the side, you will need them later. 2-pole connector: 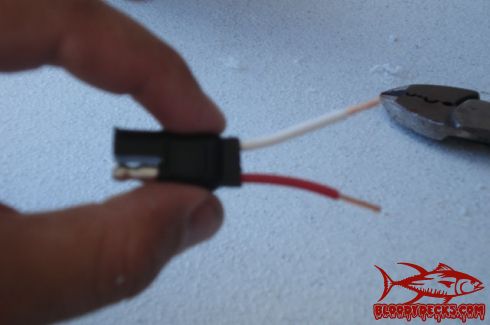 Take the lampwire and push it through the hole in the 1/2" pvc plug. You may need to shave the end of the wire to make it fit but it should go through without doing this. 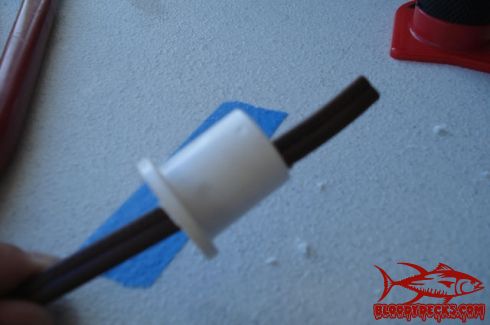 Split the lamp wire about an inch and strip 1/4-3/8" off the end of both the positive and negative sides. Attach a butt connector to each side of the lamp wire. In the pictures I used weatherproof/waterproof butt connectors. It is not necessary to use them though as this will be inside the watertight box so you have the option of using regular butt connectors here. TIP: It is incredibly important at this time to identify which part of the lamp wire will be positive and which will be negative. The lamp wire has a smooth wire and a ridged wire that are fused together. Personally I always make the ridged part of the wire the positive. Next crimp on the wires that were left over from when we split the 2-pole connectors (you should have about 5-6" of red and white wires). It is incredibly important to make sure we have the positive wire (red) attached to the ridged lamp wire and the negative wire (white) attached to the smooth side of the lamp wire. 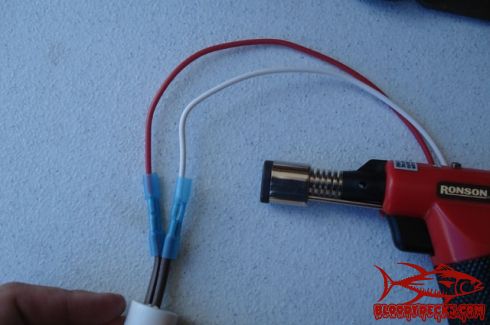 Cut the red wire in half at this point. Strip both sides of the loose wire and also strip the end of the red wire that is attached to the butt connector. Crimp on a 16-14AWG female connector to each of the stripped ends of the red wire (3). 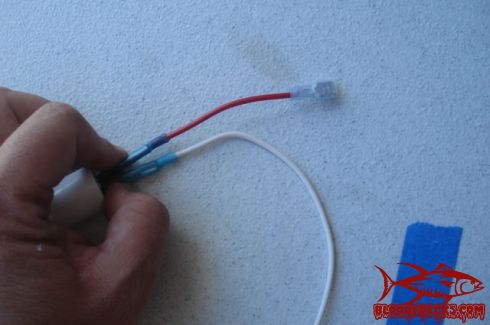 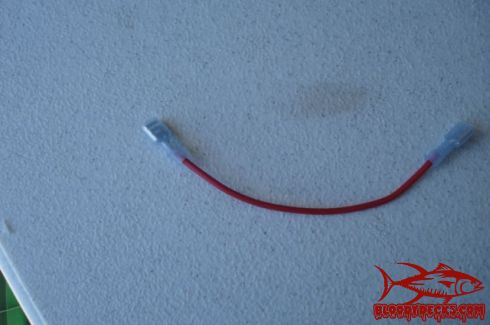 Put the red wire with the 2 female connectors to the side for later. Finished product: 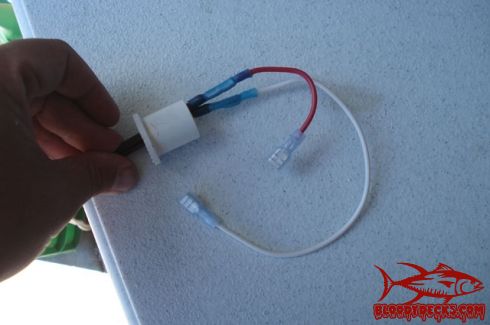
|
|
|
|
|
09-12-2009, 01:15 AM
|
#5 |
|
Senior Refuge Member
Join Date: Oct 2006
Location: California
Posts: 226
|
Step 4:
We will now be sealing the plug into the box. This can be done with the lamp wire running through the plug or without it. I would suggest pulling the lamp wire out of the plug while doing this. You can put the lamp wire back through the plug later. Take the 5200 sealant and put a bead around the lip of the 1/2" pvc plug. I like a large bead of the 5200 on the plug as I want to make sure I get a good seal. Insert the plug into the hole in the watertight box. Seat the plug and slowly rotate it to get a good seal. You also want to put a bead of sealant around the plug on the inside of the box. Rotate it eh plug to get complete coverage and a good seal. Place the box upright to the side so the 5200 can cure (I prefer 24hrs). 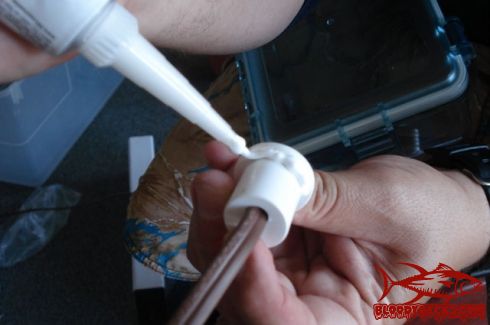 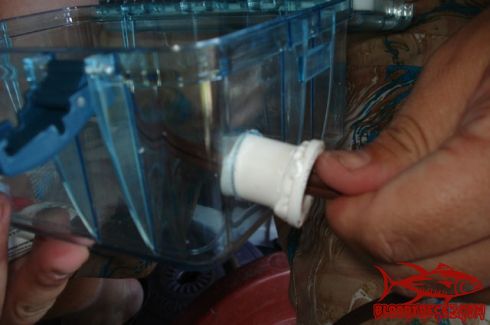 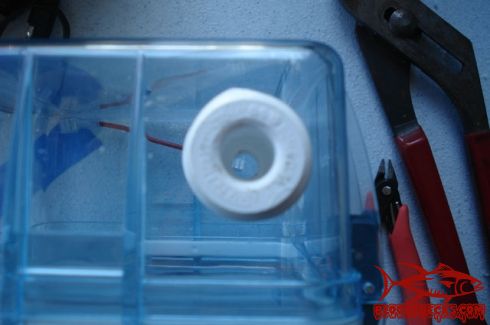
|
|
|
|
|
09-12-2009, 01:16 AM
|
#6 |
|
Senior Refuge Member
Join Date: Oct 2006
Location: California
Posts: 226
|
Step 5:
Take the Avery duck butt and the bilge pump and place the duck butt upside down. Center the bilge pump on the keel. Since the outflow for the bilge pump is off center make sure to twist the bilge pump so that the outflow is turned towards the center of the decoy. Make a couple of marks on the bilge pump and the decoy with the sharpie so we can line up the bilge pump correctly again. 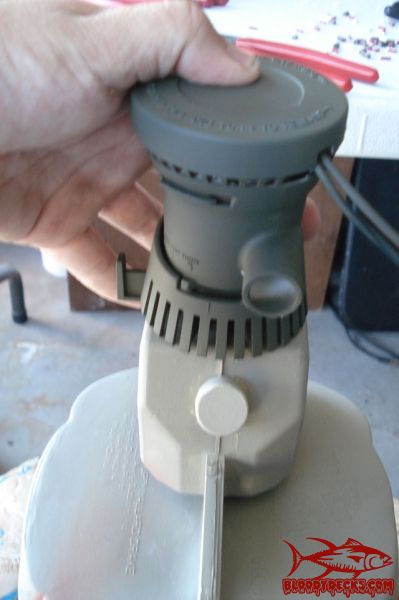 Remove the base of the bilge pump (button that says press here) and place the bilge pump cartridge off to the side. Line up your marks on the bilge pump housing with those on the decoy and then use your sharpie to mark the mounting holes on the keel of the decoy. 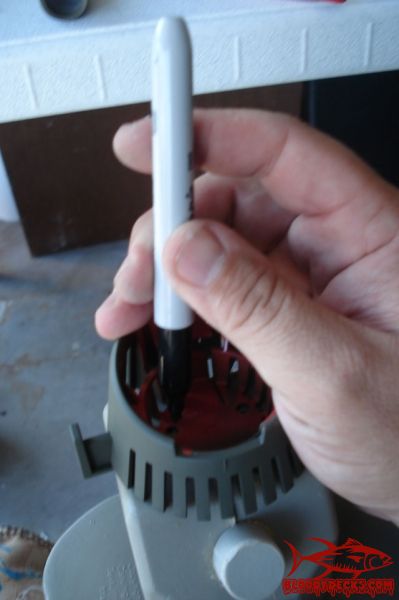 Take a small drill bit and drill out some guide holes for the mounting screws. 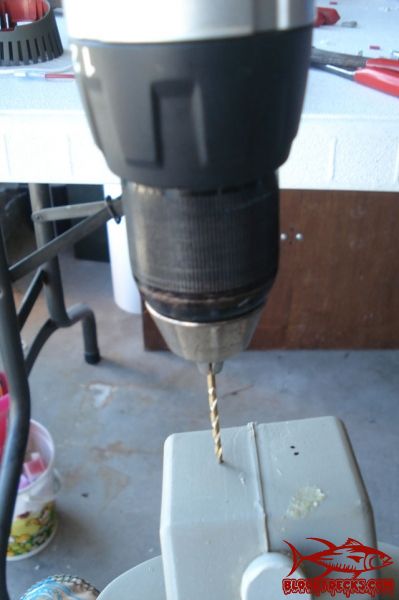 Put a small bead of 5200 on each of the holes to seal them. 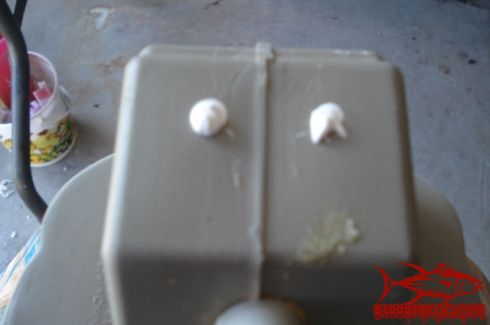 Next, you will put the screws through the base of the bilge pump and screw the base onto the keel of the decoy using the guide holes you created previously. 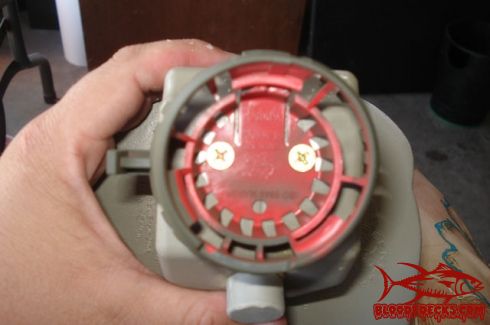 Re-attach the bilge pump cartrige to the base and decoy. 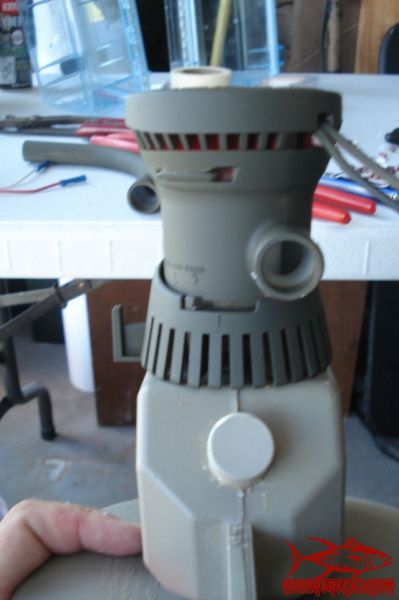
|
|
|
|
|
09-12-2009, 01:17 AM
|
#7 |
|
Senior Refuge Member
Join Date: Oct 2006
Location: California
Posts: 226
|
Step 6:
Take the mesh drywall tape and cut an 8" piece off. Now cut it down the middle lengthwise. 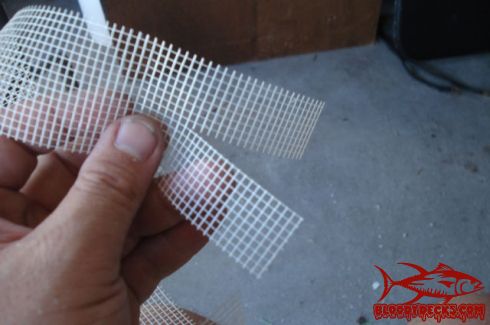 Wrap the mesh tape around the outflow of the bilge pump.  Once you have it wrapped on you want to take the 1/2" 90deg conduit and slide the bell end over the tape. You want to make sure it fits snugly. If it is too tight then trim some of the mesh tape off. If it is too loose add a little more mesh tape. You do not want to have to fight to get the conduit onto the tape on the outflow. It should slide on with a little resistance but not much and should stay there if you let go of it. 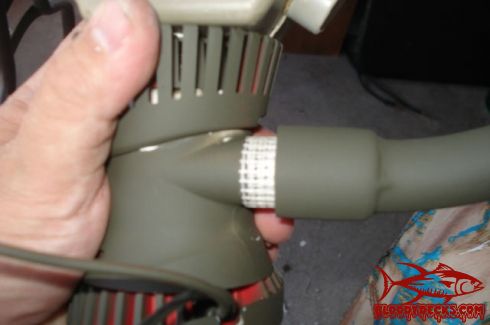 Take the 5200 and start putting it onto the mesh tape on the outflow. Make sure that the 5200 is going through the mesh and contacting the plastic of the bilge pump. I usually cover the tape from the farthest end away from the bilge pump about a 1/2-2/3" down the tape in 5200. You do not need to have a lot of 5200 on the tape but you do want to make sure it is penetration the mesh. Put a small bead on the inside edge of the bell of the conduit also. 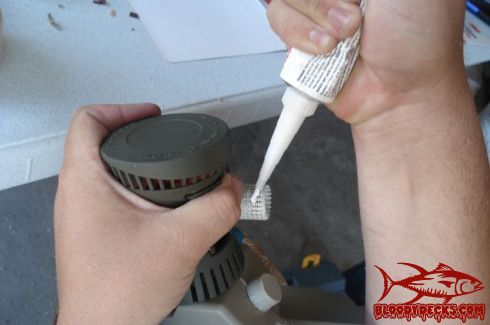 Slide the conduit onto the tape slowly rotating it so that you get good coverage of the 5200 inside the bell. Once you have it all the way on the bilge pump you will want to tilt so that it is pointing towards the centerline of the decoy. The tube will look a little tilted but it will not affect how it works.  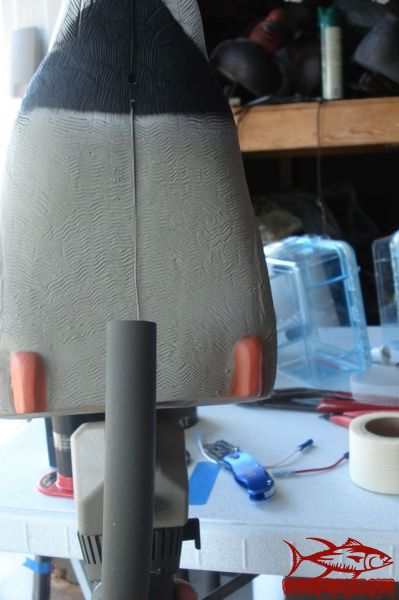
|
|
|
|
|
09-12-2009, 01:18 AM
|
#8 |
|
Senior Refuge Member
Join Date: Oct 2006
Location: California
Posts: 226
|
Lay the decoy down so the tube is on top and then brace the tube with something so the 5200 can cure (24hrs).

|
|
|
|
|
09-12-2009, 01:20 AM
|
#9 |
|
Senior Refuge Member
Join Date: Oct 2006
Location: California
Posts: 226
|
Step 7:
This next step should only be done after you have let the 5200 on the plug/watertight box cure. Insert the end of the lamp wire that is still unfinished through the hole in the plug from the inside of the box towards the outside of the box. Pull the lamp wire through until you have 1" of lampwire remaining between the butt connectors and the plug. 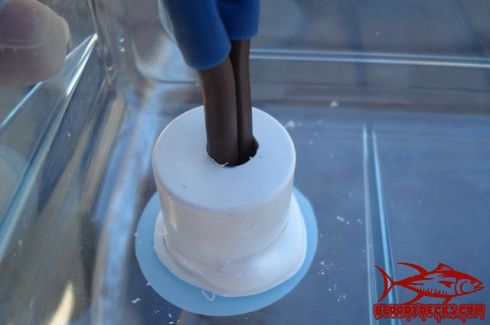 Using masking tape, seal up the holes between the lamp wire and the plug. 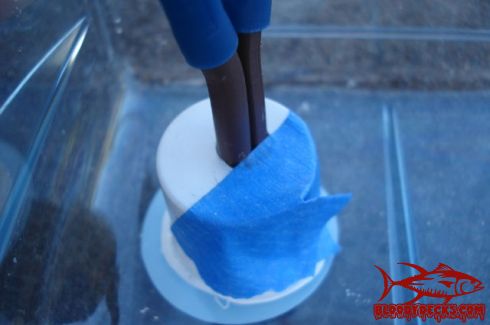 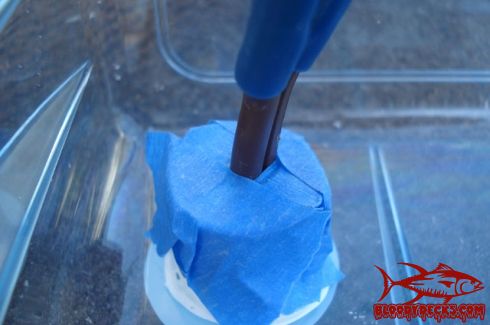 Take your 5200 and start to fill the inside of the plug. Move the wire to one side, fill the plug and then move the wire to the other side and continue to fill the plug. You want to make sure the entire inside of the plug is filled with 5200. This will seal off the wire connection to the box. Place the box on the ground and then raise the wire up and hang it off something so it is centered in the plug/5200. Set this in a place where it will have 24hrs to cure. You may want to check back after about 20 minutes as the 5200 will fill any airpockets that were left and you may want to add some more 5200 to the inside of the plug. 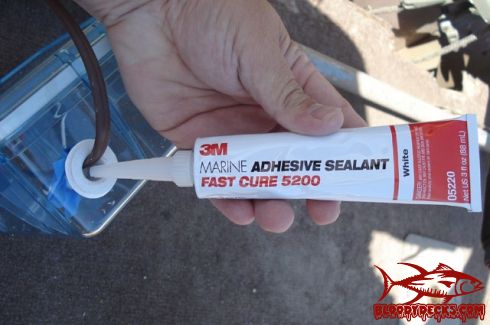 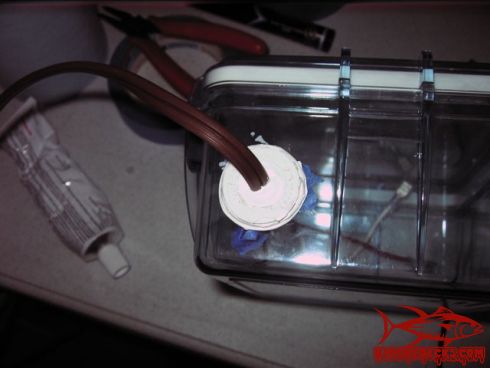
|
|
|
|
|
09-12-2009, 01:21 AM
|
#10 |
|
Senior Refuge Member
Join Date: Oct 2006
Location: California
Posts: 226
|
Step 8:
This step should be done after the 5200 in the plug from the previous step has cured. You are going to want to take sandpaper (either on a block or as I did and use an electric sander) and rough up the outside of the watertight box. This will help the spray paint stick. Plastic is a notoriously difficult surface to get paint to stick to. The ones I built last year have paint chipping off them. Honestly though, these will be sitting in the mud down below the water so if the paint is a little chipped and flaking off it really won't make that big of a difference to the ducks. 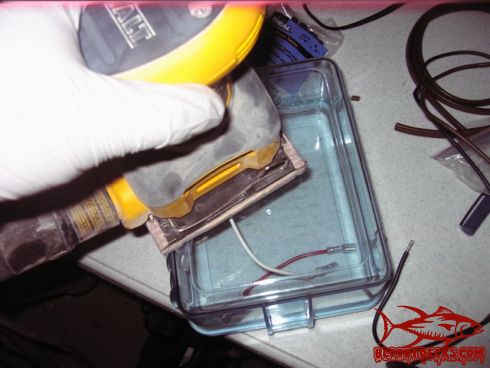 On the left is one that has had the surface roughed up and on the left is one prior to having the surface roughed up. 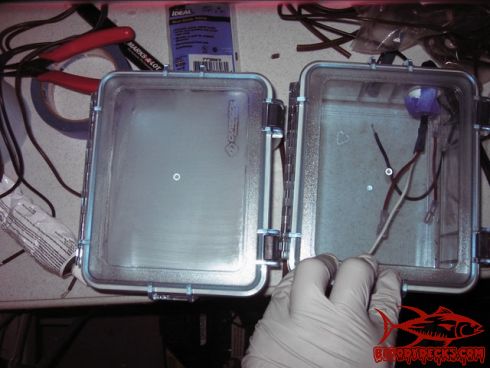 Next you want to spray paint the box. I do two coats of paint. 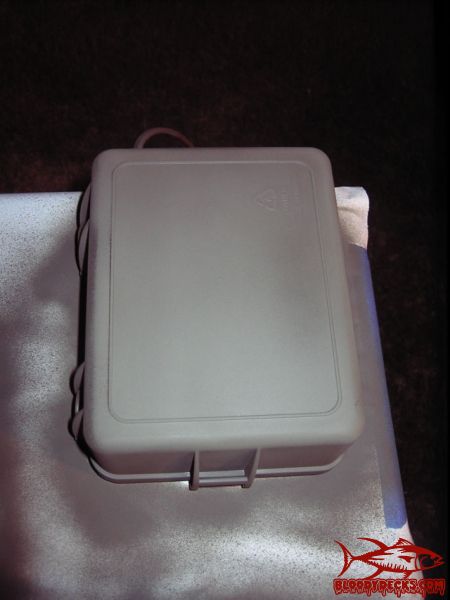 Finished product: 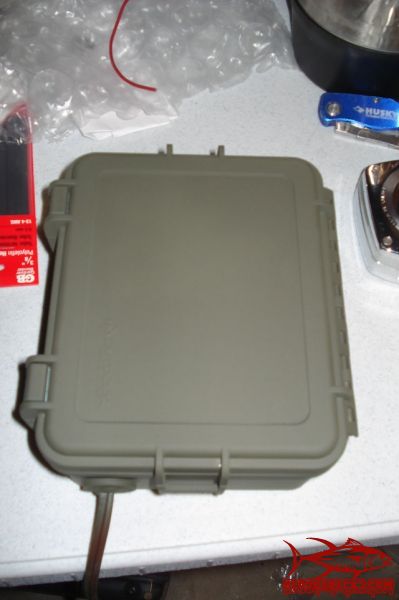
|
|
|
|
|
09-12-2009, 01:22 AM
|
#11 |
|
Senior Refuge Member
Join Date: Oct 2006
Location: California
Posts: 226
|
Step 9:
The next step is connecting the 2-pole connector to the bilge pump. Cut the wires coming out of the bilge pump so they are 4-6" long and then strip the ends 1/4-3/8". Take a 4" x 1/4" piece of shrink tube and cut it in half so you have 2 x 2" pieces of shrink tube. Slide these over the bilge pump wires. Now crimp on a weatherproof/waterproof butt connector to the bilge pump wires. You want to make sure you are using weatherproof/waterproof butt connectors not regular ones as the weatherproof/waterproof ones will shrink down and seal the wire. Regular butt connectors will not. Use your torch/lighter to shrink the connector down. Next you are going to crimp on the 2-pole connector. For the bilge pump the brown wire is positive and the black wire is negative. Make sure to connect the red wire (positive) of the 2-pole adapter to the brown wire (positive) of the bilge pump. Next connect the white wire (negative) of the 2-pole adapter to the black wire (negative) of the bilge pump. Now slide the shrink tube up over the weatherproof/waterproof butt connector, center it over the butt connector and use your torch/lighter to heat up the shrink tube. 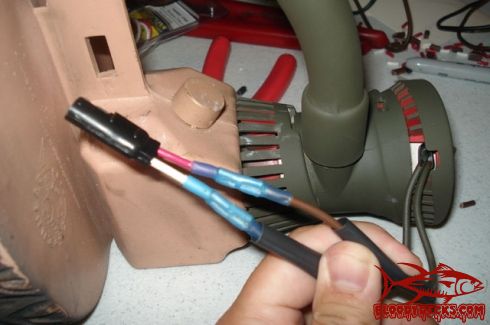 Finished product: 
|
|
|
|
|
09-12-2009, 01:23 AM
|
#12 |
|
Senior Refuge Member
Join Date: Oct 2006
Location: California
Posts: 226
|
Step 10:
Take the end of the lampwire, split the wire about 2 inches and then strip 1/4-3/8" off the end of the lamp wire. Crimp on a weatherproof/waterproof butt connector to both the positive and negative wires. Take your torch or lighter and heat the butt connector so it shrinks down on the wire. You want to make sure you are using weatherproof/waterproof butt connectors not regular ones as the weatherproof/waterproof ones will shrink down and seal the wire. Regular butt connectors will not. Take one of the 4" pieces of 1/4" shrink tube and cut it in half so you have 2 x 2" pieces. Slide these over the butt connectors. You want to make sure that the shrink tube slides down far enough so that you can crimp the other half of the butt connector. If needs be split the lamp wire a little bit more. You will now crimp the positive wire of the 2-pole connector (red) to the ridged side of the lamp wire and then crimp the negative side of the 2-pole connector to the smooth side of the lamp wire. Use your torch or lighter to once again heat up the other side of the butt connector to get it to shrink down on the wires from the 2-pole connector. Be careful not to heat up the shrink tube while you are doing this. Once it has cooled off slide the shrink tube over the butt connector, making sure it is centered over the butt connector and use your torch/lighter to heat up the shrink tube so it will seal off the butt connector. In my pictures below I attached the butt connectors to the 2-pole connector first. I would not suggest doing this as you have to split the lampwire a lot more to get the shrink tube below the butt connector so you can crimp the lampwire to the 2-pole. 2-pole connector: 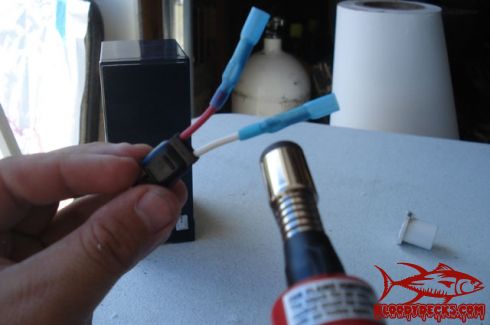 Finished product: 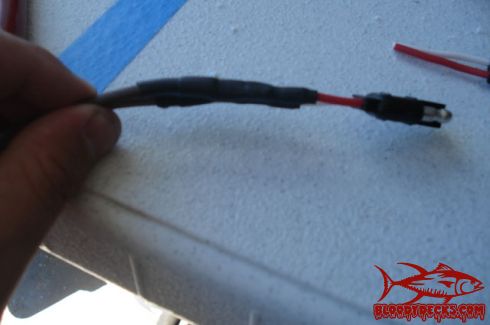
|
|
|
|
|
09-12-2009, 01:24 AM
|
#13 |
|
Senior Refuge Member
Join Date: Oct 2006
Location: California
Posts: 226
|
Step 11:
Next we are going to assemble everything in the watertight box. The easiest way to do this is to attach the red (positive) wire coming out of the plug to one of the terminals on the flasher using the femlae connector. Next, take the short red wire with the two female connectors and attach it to the other terminal on the flasher. Attach the other end of the red wire to the red (positive) terminal on the battery. Next attach the white (negative) wire with the female connector to the black (negative) side of the battery. Here is a view of how everything should be connected: 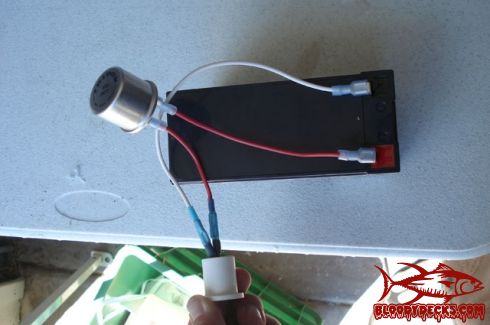 Here is how it will look when everything is in the box: 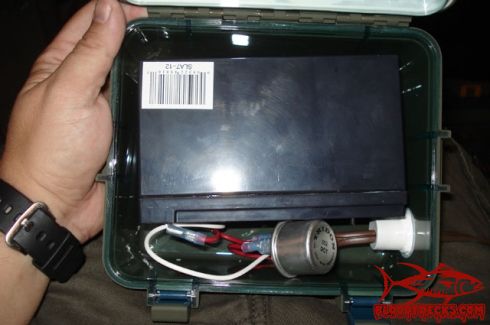
|
|
|
|
|
09-12-2009, 01:25 AM
|
#14 |
|
Senior Refuge Member
Join Date: Oct 2006
Location: California
Posts: 226
|
Closing:
It will take you about a half an hour to an hour a day for a couple of days to finish the whole project. It is actually very easy and a lot of fun. These work for luring in ducks and I wouldn't be without one anymore. Here's a final picture of everything once done: 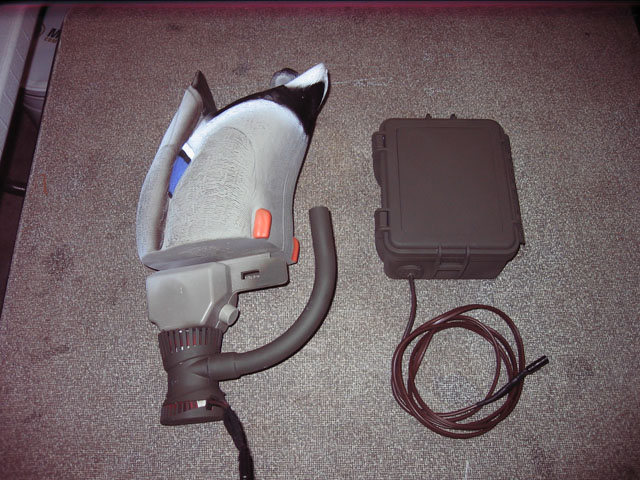 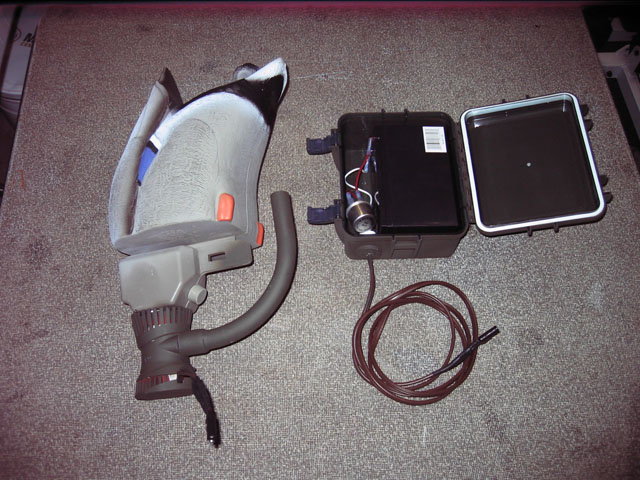 Hope you enjoyed the tutorial. |
|
|
|
|
09-12-2009, 03:11 AM
|
#15 |
|
Senior Refuge Member

Join Date: Aug 2007
Location: Alaska
Posts: 357
|
Thanks for the info
But I think this has been cover many times. Maybe someone should MAKE A STICKY
 .
I almost put some together this year, but came up with a battery
operated jerk cord. Flick of a switch and they go out. Flick and they
come back. I'll try to get some pics up by the end of season still
working out a few bugs. I plan on going with a remote next year. So far
it has worked great. I was shooting some video of it when my partner
informed me a duck was coming in. I shut off the camera and shot the
bird. .
I almost put some together this year, but came up with a battery
operated jerk cord. Flick of a switch and they go out. Flick and they
come back. I'll try to get some pics up by the end of season still
working out a few bugs. I plan on going with a remote next year. So far
it has worked great. I was shooting some video of it when my partner
informed me a duck was coming in. I shut off the camera and shot the
bird.  I may still put a butt or two together for a winter project. I may still put a butt or two together for a winter project.
__________________
Even the Devil would have Sympathy  http://adventuremongers.com/index.ph...id=40&catid=13 |
|
|
|
|
09-12-2009, 06:48 AM
|
#16 | |
|
Refuge Member
Join Date: Oct 2008
Location: Onalaska, Wis.
Posts: 90
|
Quote:
VERY well done, thanks for the demonstration. |
|

|
|
|
09-12-2009, 07:40 AM
|
#17 |
|
Refuge Member
Join Date: Sep 2006
Location: MS
Posts: 30
|
I followed the instructions from the past to do my own this summer. I
cut off the majority of the weighted keel of the decoy and used a piece
of Trek decking (synthetic wood) put in place of the bottom where I cut
it off. Made the whole thing about two inches shorter, and better for
those really shallow areas. I also used a different flasher and put
some galvanized small diameter cable slightly shorter than the lamp
wire so I could pull the battery box up by the cable without worrying
about pulling everything apart. All these were ideas put together from
seeing the other guy's projects with theirs over the last few years.
|
|
|
|
|
09-12-2009, 08:24 AM
|
#18 |
|
Senior Refuge Member
Join Date: Apr 2008
Location: texas
Posts: 131
|
can you cut the keel all the way off and just attach the pump to the bottom of the DB?
|
|
|
|
|
09-12-2009, 08:42 AM
|
#19 |
|
Senior Refuge Member

Join Date: Mar 2007
Location: Old Dallas, TX
Posts: 973
 |
Good job and good step by step. These really add alot of motion on a calm day and pulls them in.
I have made several of these sets for friends and used RedHead butts from Bass Pro with the cut keel flat to attach the Tsunami pump base with screws. Base of the butt to bottom of bilge is 4". Too bad they stopped making the Attwood V500, it drew less amps and was easier to mount. If the thermal flasher gives out, go with an electronic one from Autozone- they have been more reliable for me and I fill them with silicone and mount them under the butts themselves. I daisy chained two butts together with 18g landscape wire for the cord and run to a single floating battery box with a switch on it. This gives motion in two places in the spread. I do like the self contained sinkable battery box above. Another alternative is to use PVC fittings and put a cap on one pump output with alot of different sized holes drilled in all directions. Without it makes a whoosh, with it a spray. I run one with, one without. I just made another set with the Tsunami pumps here they are side by side with my old the Attwood pumps- you can see how they are mounted to the butt: 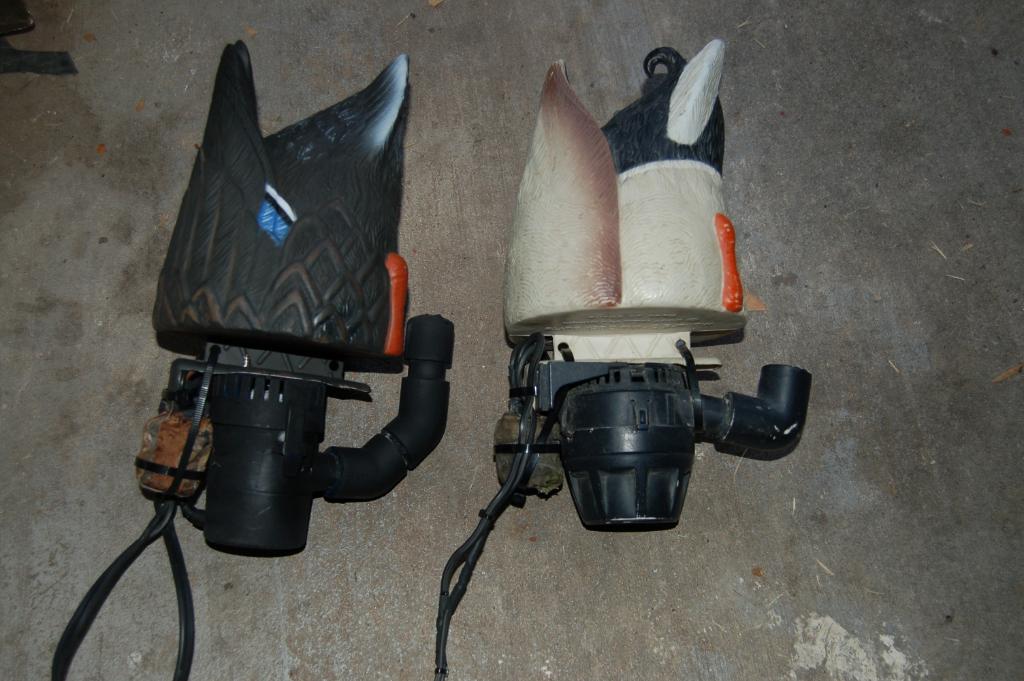 Floating battery Box: 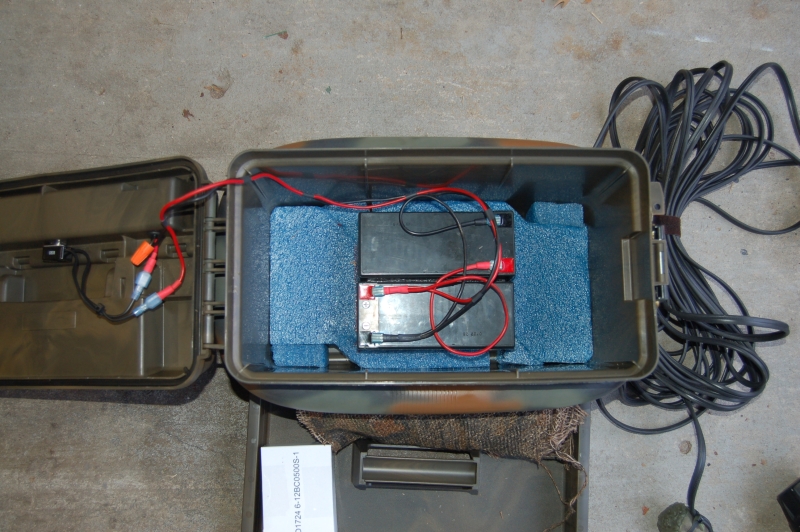 Don't intend to take away from your post- just giving people ideas for different variations. |
|
|
|
|
09-12-2009, 05:36 PM
|
#20 |
|
Refuge Member

Join Date: Mar 2009
Location: Jackson Co. - So. IL
Posts: 59
|
Good post with detailed instructions.
 I made one 4-5 yrs. ago but with the cord running to the boat/blind instead of with the batt. being underwater. I made one 4-5 yrs. ago but with the cord running to the boat/blind instead of with the batt. being underwater.
__________________
If it flies it dies... yes that means DIVERS too! |
|
|
|


 Linear Mode

