***HardHat Light Build Instructions with
Pictures***
A little background information. I originally
bought a HardHat light from HERE after a
recommendation from a 'fuge member. It's a must if you run a boat duck hunting.
I've yet to find a spot light as bright as this light, plus it leaves both hands
free to operate the boat. Well, after a year of use the bulb finally went out in
my light. I called the company, and they wanted $50 for a bulb.  I tried to
get a part number for the bulb, but the guy told me they were originally an
aircraft landing bulb that GE had discontinued and only made special orders for
them.
I tried to
get a part number for the bulb, but the guy told me they were originally an
aircraft landing bulb that GE had discontinued and only made special orders for
them. ") YEAH RIGHT! Armed with knowing the bulb
ran off 12V, was made by GE, and was 100W I went on a search for a bulb. After
breaking the hardhat light down to uninstall and reinstall the new bulb, I
realized how simple these lights are and decided to make a few for friends and
fellow 'fuge members who have hunted with me and wanted one of these lights. In
my search for a bulb, I ran across a bigger bulb I thought might work better.
The bigger (PAR46) bulb is a little brighter than the (PAR36) bulb, but IMHO
isn't bright enough to justify the extra cost and weight of the bulb. So, in my
instructions/part lists you will see two different size bulbs and funnels to
house the bulbs. Other than that fact everything else should be the same. Now
for the parts!
YEAH RIGHT! Armed with knowing the bulb
ran off 12V, was made by GE, and was 100W I went on a search for a bulb. After
breaking the hardhat light down to uninstall and reinstall the new bulb, I
realized how simple these lights are and decided to make a few for friends and
fellow 'fuge members who have hunted with me and wanted one of these lights. In
my search for a bulb, I ran across a bigger bulb I thought might work better.
The bigger (PAR46) bulb is a little brighter than the (PAR36) bulb, but IMHO
isn't bright enough to justify the extra cost and weight of the bulb. So, in my
instructions/part lists you will see two different size bulbs and funnels to
house the bulbs. Other than that fact everything else should be the same. Now
for the parts!
PART LIST:
1-Hard Hat
1-GE 13V 100W PAR36 or GE 13V 100W PAR46 bulb
(Grainger part #'s
6VK26 and
6VK36 respectively)
1-Funnel (1PT Tin funnel
part #62898 at ACE hardware for the PAR36 bulb or 1QT Steel funnel part #4ZH66
at Grainger for the PAR46)
1-Switch (Grainger part #1X692)
1-12'
piece of 16ga. Landscape Lighting Cable (Found at Home Depot....I bought 100' as
I was making several lights. You can get some off a spool if you don't want a
100' or 50' bundle. The original light had 6' or wire on it, but I found that
too short, so the lights I made I put an extra 6' of wire on
them)
1-Aligator Clips (Found at Home Depot made by Buchanan 50
Amp)
1-Grommet (Found at Home Depot made by Buchanan 1/4' inside
diameter)
1-packet of #10-24 by 1/2" nuts and bolts (Found at Home
Depot)
1-packet of 14-16ga wire connectors (Found at Home Depot....need
4)
Misc. items........cordless drill, knife, wire pliers, tin snips,
drill bits, silicone, sharpie, pliers, screwdriver, etc.
Attached is a
picture of the parts with a few things missing such as the wire pliers,
silicone, sharpie, etc.

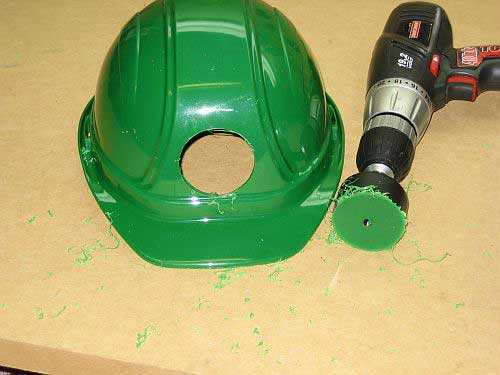
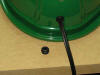
1st take the hard hat without the liner in it and
mark the center on the front of the hat about 1/2" above the bottom of your hole
and the bill of the HH to allow the funnel to pass thru and also be able to
attach the front of the funnel to the front of the bill. I used a 2 1/4" drill
bit to accomplish this. See picture #2!

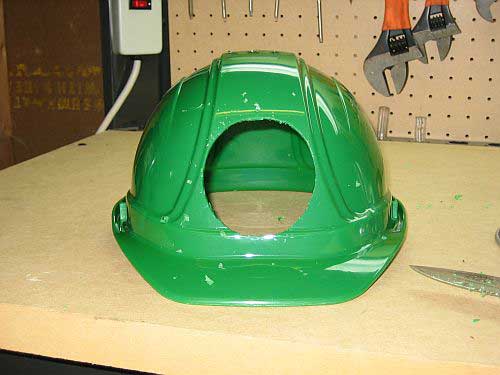
Next, you
want to take a knife and hog out the hole a little more to allow enough of the
funnel to pass thru where you can cut tabs off the tapered end to flare out
inside the hard hat to attach on both sides of the hole. I just keep shaving off
more and more of an opening while using the funnel as a judge until I was happy
I had a big enough hole to accomplish this. See picture #3!
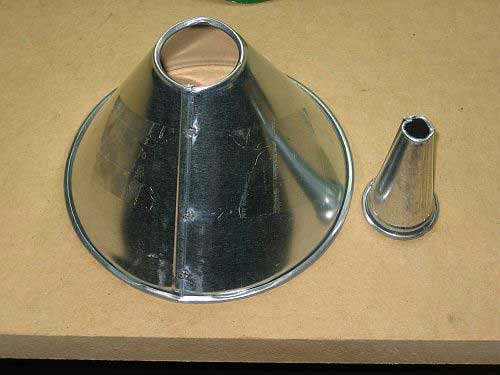
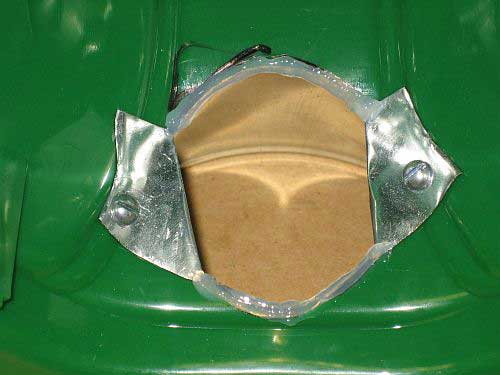
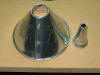
Next, take your metal funnel and hammer the tapered
end free from the bigger portion of the funnel. This took little effort with a
regular hammer. I guess this should be the step before hogging out the hole you
drilled in the hard hat as it will make it easier to judge if you have enough
funnel material on the inside of the hat to make your ears to attach on each
side of the hole you created. See picture #4!
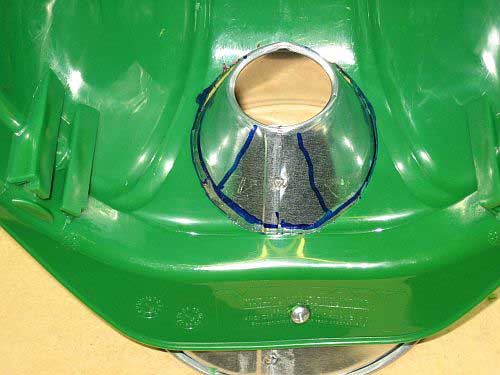
After you
have created your hole and are satisfied it is big enough as well as knocked the
tapered end off the funnel, it's time to mark your funnel with a sharpie where
you want to cut to make your ears. I accomplished this by using a self tapping
metal screw to hold the front of the funnel to the front of the bill of the hard
hat once I was satisfied the funnel fit how I wanted it to in the hole I
drilled. See picture #5!

It should be
noted in picture #5 that I put the seam of the funnel on the very bottom or next
to the bill on the hard hat slightly off center. I did that for a couple of
reasons. 1) I didn't have to attach a screw thru the seam and 2) the seam wasn't
part of one of my ears where I had to try and bend across the seam.
After you have your funnel marked, take the
self-tapping screw out and remove the funnel from the hat. Next, take a pair of
tin snips and cut the ears on the funnel as you have marked. I didn't take a
picture of this step, but I think you will get the idea in the next picture.
Once you have your ears cut (it will look like you cut two U's on the smaller
end of the funnel if you marked correctly), bend the funnel along the lines
where the funnel meets the inside of the hard hat. This will make it easier to
bend the ears to the inside of the hat once you put the funnel back thru the
hole. You will have the bend the funnel back as close to it's original shape as
possible to get it back thru the hole. Stick the funnel back thru the hole and
attach the self-tapping screw in the original hole. Next, bend your ears to the
inside of the hard hat, drill two holes, and insert your #10 bolts and nuts. Be
careful to insure you have enough material on the hard hat to make a hole for
the bolt to go thru. Also, take the self-tapping screw out, drill a hole for the
#10 bolt, and attach to hardhat using the bolt and nut. See picture
#6!
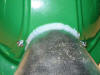
I left the
next step out originally when I made the first two, but I think it's easiest to
perform this step now. Take and run a bead of silicone around funnel on the
outside seam where the funnel and hardhat meet. See picture #7.
After running the bead of silicone around the
outside of the funnel, flip the HH over and run another bead where you cut the
U's out of the funnel in between the two ears you bent to the attach the funnel
to the inside of the HH. This will do a couple of things. 1) Keep water out
incase it's raining where you don't short out the light and 2) Keep someone from
cutting themselves on the sharp edges created by the tin snips. You might also
want to put some silicone on the ears you created as they have some sharp edges.
See picture #8!

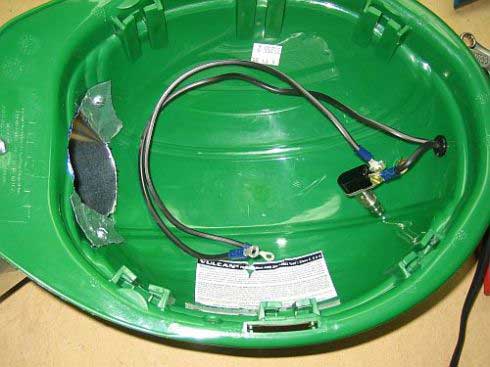
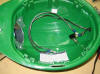
After letting
the silicone dry, you want to drill two holes in the back of the HH. One is to
run the wire thru the grommet, and the other is for the switch. The grummet uses
a 3/8" drill bit, and the switch uses a 7/16" drill bit. However, you will have
to wallow the hole a little for the switch as the 7/16" isn't quite big enough,
but the 1/2" bit is too big. Be careful not to make the hole two big as the nuts
that keep the switch in place that attach from the outside don't leave too much
room for error. See picture #9!
Next, take the 12' piece of landscaping wire or
which ever length you chose and run the grommet onto the lose wire. Stick the
wire thru the 3/8" hole, and use a small screwdriver to press the grommet thru
the hole. The grommet makes a clean finished look and keeps the wire from
running in and out of the hole. After you have the grommet in the hole make sure
you have enough wire to run from the hole against the top of the HH and out the
funnel to attach to the light bulb, but I wouldn't have a lot of slack. Then
take the wire and spit it all the way back to the grommet. See picture #10!
After you
have split the wire back to the grommet, take and cut one side of the wire about
1 1/2" from the grommet to attach to one side of the switch. Don't worry. If you
cut the wire too short you can always pull some more wire thru the grommet and
split the length you need back to the grommet. Attach the 14-16ga. wire
connectors to the each end of the wire you cut and the other ends of the wire
running thru the grommet. You should have 4 connections in all. Take the short
piece of wire from the grommet and attach to the switch. Take the lose piece of
wire with two connections on each end and connect to the other side of the
switch. See picture #11!
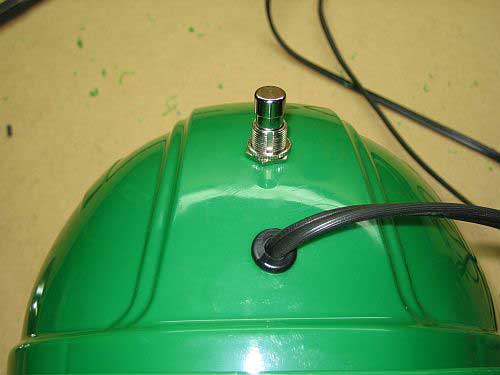
Next, take the switch and push thru the 7/16" hole
you drilled. Once the switch is in place, put the setscrew on and the locking
screw on the switch securing it in place on the HH. See picture #12!
I would put
the switch in with the two connections of the switch running down the inside of
the HH toward the grommet. I did this so I could keep the wires as close to the
inside of the HH as possible and to not interfere with the hat sitting on my
head. See picture #13!
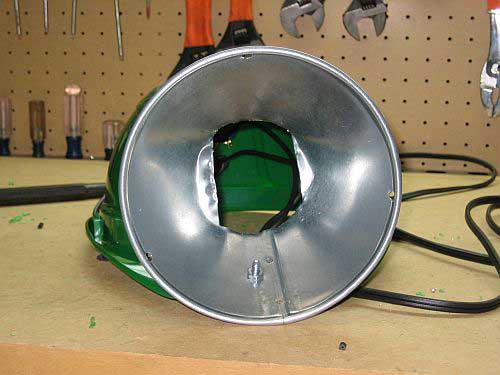
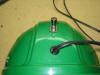
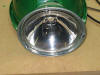
Next, take and place the bulb inside the funnel.
Let the bulb fall all the way down inside the funnel until the edges of the bulb
are touching the inside of the funnel. Make sure and get the bulb straight in
the funnel. Meaning you don't want the beam of the light shinning up or down
when you have the HH sitting straight on your head. You will have to angle the
hat then to get the light where you like it. Once you are satisfied you have the
bulb where you want it in the funnel, take a sharpie and make for three holes to
secure the bulb in place with the #10 bolts and nuts. You might have to wallow
out the holes to angle the bolts depending on how you drill them and where they
fall next to the edges of the bulb. See picture #14! Notice in picture number
#14 you can see a bolt sticking thru the funnel attaching the funnel to the bill
of the HH. This should have been done in step #6. Note here that I'm using the
larger bulb. There is enough clearance for the nut to go on the inside of the
funnel and behind the bulb. You will need to run the bolt and nut the opposite
direction if using the smaller bulb to allow enough clearance for the smaller
bulb to rest inside the funnel. Notice the 3 holes to hold the bulb into place
on the outside edges of the funnel.

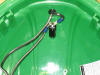
Next, take
the bulb and attach the two lose connections to each side of the bulb. It should
be noted that the 14-16ga wire connectors are a shade too small to allow the
bolts that secure the connections to the light to pass thru. You will need to
take a drill bit and wallow the hole on the connectors out a little. Lesson
learned here. Do this before you attach them to the wire as you might bend the
connectors beyond use if the bit bits since the material they are made of is
very soft. See picture #15!
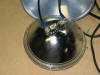
Once you've got the connections to the bulb secure,
push the bulb into the funnel and secure it in place with the bolts and nuts
thru the holes you pre-drilled in step #14. See picture #16! Be careful here as
depending on where you holes are located you might not be able to tighten the
nuts all the way down without cracking the glass lens. The HH I bought used
nylon bolts and nuts. This would have been my first choice, but I couldn't find
them locally. Also, make sure the bulb is tight in the funnel. You don't want it
to be loose and move around in the funnel.
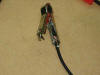
The next
step is to take the other end of the landscaping wire and attach alligator clips
to each end. Split the wires about 1'. Just make sure you have enough split to
attach to the (+) and (-) terminals on a battery. I took some electrical tap and
tapped just above my split to keep the wire from splitting further and having
two lose wires vs. 1. Also, when attaching the alligator clips, make sure and
slide the protective sleeve onto the wire before you attach to the clip so you
can slide it back over the metal handle once the connection is made. See picture
#17!
You can also attach a cigarette plug to the end of
the HH if you wish. I did do this for a buddy of mine. I caution you if you do
this. Make sure you get a plug rated for the current this bulb will draw. I
found a 20 amp rated cigarette plug. This should handle the current draw and not
melt the plug. However, be sure the female end you are plugging the cigarette
plug into can also handle the current. I really didn't like this method, as I
couldn't get a good connection inside the cigarette plug no matter what I did.
Maybe my soldering skills need a little work.
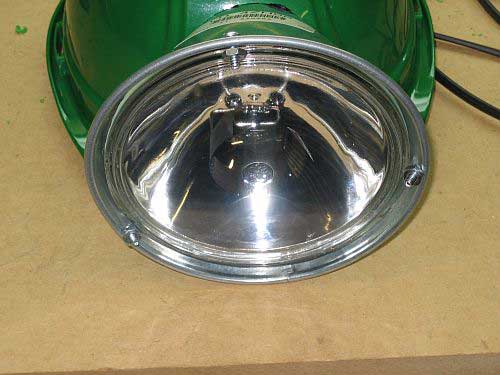
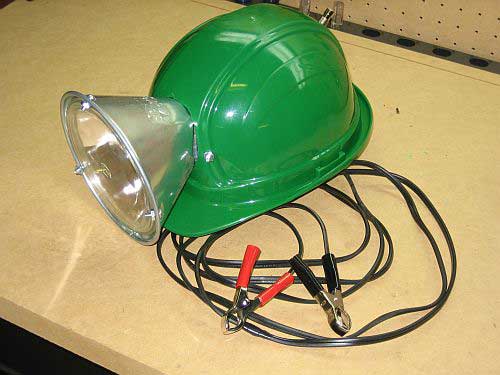
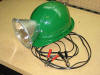
Here is the completed product. See picture #18!
This is a picture using the bigger bulb (PAR46).
Believe it
or not the biggest problem was finding a metal funnel once I narrowed down which
bulb I wanted to use. Most any GE 12V or 13V PAR36 or PAR46 bulb will work. I
have yet to run these bulbs for a season, so I don't know how long they will
last as far as run time or the reliability of the light from the abuse it will
take i.e. vibration from ridding in the boat, dropping, etc. I chose the bulbs I
am using due to amount of candlepower, rated life, and price. I can tell you
these babies will like up a city block. Just ask my neighbors.  Feel
free to ask any question, critique my work, or add anything you think will add
to the build of the light. They are pretty easy to make if you are the very
least mechanically inclined. If you can't get in touch with HardHat light in the
link I post (some people have told me the site is down) and don't want to make
your own, I might make a few more if I have some free time.
Feel
free to ask any question, critique my work, or add anything you think will add
to the build of the light. They are pretty easy to make if you are the very
least mechanically inclined. If you can't get in touch with HardHat light in the
link I post (some people have told me the site is down) and don't want to make
your own, I might make a few more if I have some free time.
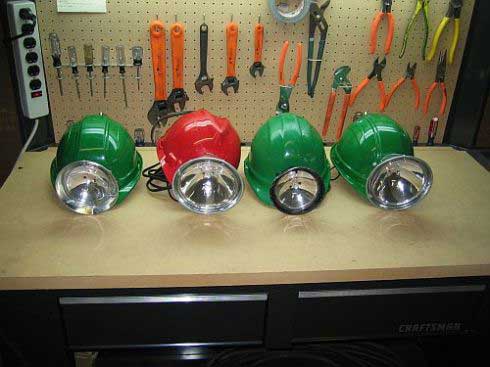
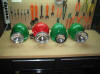
Here is the
last picture (#19). In this picture starting left to right, there is a PAR36
(small bulb) that I made, a PAR46 (bigger bulb) I made, the original hardhat
light I bought, and another PAR46 that I made. The reason the HH on the left
doesn't look like a small bulb is due to the funnel. It's hard to find a funnel
with a 4" diameter that is metal. The closest I could come was 5-5 1/2" that I
found at Ace Hardware. The PAR36 bulb is 3 1/2" in diameter. The PAR46 is 6" in
diameter I believe. I used a 7" diameter funnel for it. Hope the instructions
are clear. Good luck! 
Thanks for Russ for putting this together.
E-mail me if you have any questions and
I'll get it to Russ.
Guestbook
Home